

How To Change The Footer Background Color In Shopify For Debut Theme
Sections for Debut
This page was printed on Dec 15, 2021. For the current version, visit https://help.shopify.com/en/manual/online-store/themes/themes-by-shopify/vintage-themes/debut/sections.
Theme content is built using sections. Sections are customizable blocks of content that determine the layout and appearance of different pages on your online store. You can add, remove, edit, and customize sections using the updated theme editor.
Shopify's themes have the following types of sections:
- Static sections: Sections that appear in predetermined locations in your online store. These sections can't be removed or rearranged. Static sections might include headers, footers, navigation sections, or content sections on pages like product pages and collection pages. For example, the Product section determines the appearance of each product page on your online store.
- Dynamic sections: Optional sections that you can use to customize the layout of your home page. On your store's home page, you can add, rearrange, and remove dynamic sections to create the page layout. You can have up to 25 dynamic sections on your home page.
You can learn about Debut's unique selection of sections and how to customize them to suit your business.
Static sections
Debut includes the following static sections:
- Header
- Footer
- Product pages
- Product recommendations
- Collection pages
- Collections list page
- Blog pages
- Posts
- Cart page
Dynamic sections
Debut includes the following dynamic sections:
- Blog posts
- Collection list
- Featured collection
- Gallery
- Image with text
- Image with text overlay
- Logo list
- Featured product
- Newsletter
- Map
- Rich text
- Testimonials
- Text columns with images
- Video
- Custom content
- Slideshow
In the header section, you can edit the content that appears at the top of every page in your store. You can add a logo image, choose which menu to show, and create an announcement message.
Add a custom logo
You can add a custom logo image to your store's header. The best format is a .png file with a transparent background. You can resize the logo image by increasing or decreasing the width.
If you don't add a logo image, then your store name is displayed as text. You can change your store name on the Store details settings page in your Shopify admin.
-
Custom logo width: The width of the logo.
-
Logo alignment: The alignment of your logo in the header. Select Left or Centered.
Add and configure your logo
- From your Shopify admin, go to Online Store > Themes.
- Next to Debut, click Customize.
- From the Shopify app, tap Store.
- In the Sales channels section, tap Online Store.
- Tap Manage themes.
- Next to Debut, tap Customize.
- Tap Edit.
- From the Shopify app, tap Store.
- In the Sales channels section, tap Online Store.
- Tap Manage themes.
- Next to Debut, tap Customize.
- Tap Edit.
- Click Header.
- In the Logo image area, click Select image, and then do one of the following:
- To select an image that you have already uploaded to your Shopify admin, click the Library tab.
- To select an image from your local computer, click Library > Upload.
- Use the settings to customize the size and placement of your logo.
- Click Save.
Add an announcement bar
You can add an announcement bar in the header that you can use to show a message to your customers. Your message is customizable and might include contact information, information about store events or sales, or a store slogan.
- From your Shopify admin, go to Online Store > Themes.
- Next to Debut, click Customize.
- From the Shopify app, tap Store.
- In the Sales channels section, tap Online Store.
- Tap Manage themes.
- Next to Debut, tap Customize.
- Tap Edit.
- From the Shopify app, tap Store.
- In the Sales channels section, tap Online Store.
- Tap Manage themes.
- Next to Debut, tap Customize.
- Tap Edit.
-
Click Header.
-
In the Announcement bar area, check Show announcement.
Select Home page only to display the announcement message on the home page only.
-
Enter the text for your announcement.
-
Optional: Enter a URL to add a link to your announcement.
-
To change the color of the announcement bar background, click the Bar color swatch and choose a color.
-
To change the color of the announcement text, click the Text color swatch and choose a color.
-
Click Save.
You can add a menu to your header. This displays all the menu's links in your header, which you can use to highlight common pages that your customers want to access. For example, you could add a menu that contains links to your collections.
- From your Shopify admin, go to Online Store > Themes.
- Next to Debut, click Customize.
- From the Shopify app, tap Store.
- In the Sales channels section, tap Online Store.
- Tap Manage themes.
- Next to Debut, tap Customize.
- Tap Edit.
- From the Shopify app, tap Store.
- In the Sales channels section, tap Online Store.
- Tap Manage themes.
- Next to Debut, tap Customize.
- Tap Edit.
-
Click Header.
-
To select a menu, click Change. Select a menu from the list or click Create menu to create a new one.
-
To edit the menu, click Edit menu.
-
Click Save.
Your theme's footer is the section that appears at the bottom of every page in your store. You can add the following features to your footer:
- payment icons
- quick links
- a newsletter signup
- a text section containing information about your business
- social media icons
- a language selector
- a currency selector
Add payment icons
You can display icons for the payment methods that you accept in your footer. This area displays the icons that are associated with the payment provider that you have enabled in the payment settings section of your admin. When a customer visits your store, these icons are filtered so that only the payment methods that are supported in the current customer's region and currency are displayed.
- From your Shopify admin, go to Online Store > Themes.
- Next to Debut, click Customize.
- From the Shopify app, tap Store.
- In the Sales channels section, tap Online Store.
- Tap Manage themes.
- Next to Debut, tap Customize.
- Tap Edit.
- From the Shopify app, tap Store.
- In the Sales channels section, tap Online Store.
- Tap Manage themes.
- Next to Debut, tap Customize.
- Tap Edit.
-
Click Footer.
-
Check Show payment icons.
-
Click Save.
- From your Shopify admin, go to Online Store > Themes.
- Next to Debut, click Customize.
- From the Shopify app, tap Store.
- In the Sales channels section, tap Online Store.
- Tap Manage themes.
- Next to Debut, tap Customize.
- Tap Edit.
- From the Shopify app, tap Store.
- In the Sales channels section, tap Online Store.
- Tap Manage themes.
- Next to Debut, tap Customize.
- Tap Edit.
-
Click Footer.
-
To add a content block, in the Content area, click Add content. Select the type of block from the following choices:
- Menu
- Newsletter
- Text
You can add up to 4 content blocks.
To remove a content block, click on the block and then click Remove content.
To customize a content block, click on the block and edit the settings.
-
Click Save.
When you add a social media account to your theme settings, it is automatically displayed in your footer.
Add a language selector
You should only add a language selector if you have enabled multiple store languages.
- From your Shopify admin, go to Online Store > Themes.
- Next to Debut, click Customize.
- From the Shopify app, tap Store.
- In the Sales channels section, tap Online Store.
- Tap Manage themes.
- Next to Debut, tap Customize.
- Tap Edit.
- From the Shopify app, tap Store.
- In the Sales channels section, tap Online Store.
- Tap Manage themes.
- Next to Debut, tap Customize.
- Tap Edit.
-
Click Sections.
-
Click Footer.
-
Under Language selector, select Show language selector.
-
Click Save.
Add a currency selector
You should only add a currency selector if you have enabled multiple currencies.
- From your Shopify admin, go to Online Store > Themes.
- Next to Debut, click Customize.
- From the Shopify app, tap Store.
- In the Sales channels section, tap Online Store.
- Tap Manage themes.
- Next to Debut, tap Customize.
- Tap Edit.
- From the Shopify app, tap Store.
- In the Sales channels section, tap Online Store.
- Tap Manage themes.
- Next to Debut, tap Customize.
- Tap Edit.
-
Click Footer.
-
Under Currency selector, select Show currency selector.
-
Click Save.
Product pages
The Product pages section is the main customizable section for product pages. This section also supports the following features if they're configured in your store:
- If you have local pickup enabled, then this section displays the product's pickup availability.
- If you have Shop Pay Installments enabled and are in the United States, then the Shop Pay Installments banner appears on the product page for eligible products. (Version 17.12.0+)
You can customize this section using the following options:
- Show quantity selector - Let users specify a quantity to add to their cart.
- Show variant labels - Show variant labels, such as "Size" and "Color" above variant drop-down menus. The variant labels that appear are based on the variant option names for the product.
- Show vendor - Show the product brand or vendor. For a brand or vendor to show, you need to add a vendor to the product.
- Show dynamic checkout button - Let customers skip the cart and go directly to the checkout from the featured product section.
- Show social sharing buttons - Show buttons that customers can use to share products on social media. The sharing options that appear are controlled by your theme settings.
Media
- Size - Set the size of your product media.
- Enable image zoom - Let customers zoom in by mousing over the product image.
- Enable video looping - Select this option to loop product videos. If this option is deselected, a play button appears on videos when they end.
Edit Product pages settings
- From your Shopify admin, go to Online Store > Themes.
- Next to Debut, click Customize.
- Open the drop-down menu at the top of the page.
- From the Shopify app, tap Store.
- In the Sales channels section, tap Online Store.
- Tap Manage themes.
- Next to Debut, tap Customize.
- Tap Templates.
- From the Shopify app, tap Store.
- In the Sales channels section, tap Online Store.
- Tap Manage themes.
- Next to Debut, tap Customize.
- Tap Templates.
- Select Product pages.
- Click the Product pages section.
- Use the settings to customize your product pages section.
- Click Save.
Show pickup availability
Debut lets you show customers whether a product in your online store is available for local pickup. On each product page, the pickup availability section shows whether the product is available, and the estimated time frame for pickup.
To use this feature, you must set up local pickup. If local pickup is enabled, then this feature is always visible on your product pages and can't be disabled.
After local pickup is enabled, the product page displays whether the product is available for pickup at a local pickup location. This information appears only for products that are stocked at at least one pickup location and have This is a physical product selected in the Shipping section of a product variant's details.
To select This is a physical product on a product variant, do the following:
-
From your Shopify admin, go to Products > All products.
-
Select a product.
-
Under Variants, select a variant.
-
Under Shipping, check This is a physical product.
-
Click Save.
If you have local pickup enabled for only one location, then the location and pickup availability is displayed for that location. Customers can click View store information to learn more about the pickup location.
If you have local pickup enabled for more than one location, then the pickup availability section displays the location and pickup availability for the location closest to the customer, based on the customer's IP address. When the customer clicks Check availability at other stores, the list of pickup locations is ordered by distance from the customer.
If the customer's location can't be determined from their IP address, then the pickup availability section displays the location and pickup availability alphabetically, first by city and then by location name. For example, suppose that you had three pickup locations: "Queen Street" in Toronto, "Front Street" in Toronto, and "Alberni Street" in Vancouver. The pickup availability section would show the details for "Front street" in Toronto.
Version 17.12.0+
If you have Shop Pay Installments enabled and are in the United States, then the Shop Pay Installments banner appears on the product page if the product priced between $50 and $1000 USD. If Shop Pay Installments is enabled, then the banner can't be disabled.
The banner appears below the product price, and indicates that customers have the ability to pay for the product in full or in 4 equal installments. Users can click Learn more to view additional information about installments and required disclosures.
Product recommendations
You can display recommended products on product pages to make it easier for customers to discover other products that might interest them.
Enable product recommendations
- From your Shopify admin, go to Online Store > Themes.
- Next to Debut, click Customize.
- Open the drop-down menu at the top of the page.
- From the Shopify app, tap Store.
- In the Sales channels section, tap Online Store.
- Tap Manage themes.
- Next to Debut, tap Customize.
- Tap Templates.
- From the Shopify app, tap Store.
- In the Sales channels section, tap Online Store.
- Tap Manage themes.
- Next to Debut, tap Customize.
- Tap Templates.
-
Select Product pages.
-
Click the Product recommendations section.
-
Check Show dynamic recommendations to show product recommendations on your product pages.
-
Optional: To change the title that appears above the recommended products, enter a new one in the Heading field.
-
Optional: To show or hide the vendors in the product descriptions, use the Show vendor checkbox.
-
Click Save.
Collection pages
The Collection pages section is the main customizable section for collection pages.
The Collection pages section includes the following settings:
- Layout - Choose the way products are arranged on the collection page.
- Products per row (grid only) - Choose the number of products to display in each row on the collection page. This section only applies if Layout is set to Grid.
- Rows per page (grid only) - Choose the number of rows of products to display on the collection page. This section only applies if Layout is set to Grid.
- Show collection image - Show the collection image at the top of the collection page.
- Show product vendors - Show the vendor for each product below the product title.
- Enable sorting - Select this option to let customers sort the products on your collection pages.
- Enable tag filtering - Select this option to let customers filter the collection by product tag.
Edit Collection pages settings
- From your Shopify admin, go to Online Store > Themes.
- Next to Debut, click Customize.
- Open the drop-down menu at the top of the page.
- From the Shopify app, tap Store.
- In the Sales channels section, tap Online Store.
- Tap Manage themes.
- Next to Debut, tap Customize.
- Tap Templates.
- From the Shopify app, tap Store.
- In the Sales channels section, tap Online Store.
- Tap Manage themes.
- Next to Debut, tap Customize.
- Tap Templates.
- Select Collection pages.
- Click the Collection pages section.
- Use the settings to customize your collection pages section.
- Click Save.
Collections list page
Your customers can use the collections list page to find the collection they want to browse. The collection list page can show all of the collections in your store, or it can show a group of collections that you select.
The Collections list page section includes the following settings:
- Collection - Set collections you want to show on the collections list page. This information is used only if Select collections to show is set to Selected.
- Select collections to show - Choose which collections to display.
- Sort collections by - Set how your collections are sorted. This setting is used only if Select collections to show is set to All.
- Collections per row - Set the number of collections to display in each row on the collections list page.
Customize your Collections list page section
- From your Shopify admin, go to Online Store > Themes.
- Next to Debut, click Customize.
- Open the drop-down menu at the top of the page.
- From the Shopify app, tap Store.
- In the Sales channels section, tap Online Store.
- Tap Manage themes.
- Next to Debut, tap Customize.
- Tap Templates.
- From the Shopify app, tap Store.
- In the Sales channels section, tap Online Store.
- Tap Manage themes.
- Next to Debut, tap Customize.
- Tap Templates.
- Select Collections list.
- Click the Collections list page section.
- Optional: In the Content area, click Add Collection to add collections to the collections list page.
- Use the settings to customize your collections list page section.
- Click Save.
Blog pages
The Blog pages section is the main customizable section of a blogs page. The blogs page lists all of the posts published to your blog. You can list your blog postings, or display them in a grid. Both the list and grid view display the blog post title and an excerpt, if available. If no excerpt is available, the first few sentences of the blog post appear.
The Blog pages section includes the following settings:
- Layout - Choose List or Grid.
- Show author - Display the author's name below the title of the blog post.
- Show date - Show the publish date below the title of the blog post.
Customize your Blog pages section
- From your Shopify admin, go to Online Store > Themes.
- Next to Debut, click Customize.
- Open the drop-down menu at the top of the page.
- From the Shopify app, tap Store.
- In the Sales channels section, tap Online Store.
- Tap Manage themes.
- Next to Debut, tap Customize.
- Tap Templates.
- From the Shopify app, tap Store.
- In the Sales channels section, tap Online Store.
- Tap Manage themes.
- Next to Debut, tap Customize.
- Tap Templates.
- Select Blogs.
- Click the Blog pages section.
- Use the settings to customize your posts section.
- Click Save.
Posts
Blog post pages display individual blog posts. The Posts section includes the following settings:
- Show author - Display the author's name below the title of the blog post.
- Show date - Show the date the blog post was published below the title of the blog post.
- Show social sharing buttons - Select this option to display social sharing buttons on your blog posts. You can choose which platforms can be used for sharing in your social media settings.
Customize your Posts section
- From your Shopify admin, go to Online Store > Themes.
- Next to Debut, click Customize.
- Open the drop-down menu at the top of the page.
- From the Shopify app, tap Store.
- In the Sales channels section, tap Online Store.
- Tap Manage themes.
- Next to Debut, tap Customize.
- Tap Templates.
- From the Shopify app, tap Store.
- In the Sales channels section, tap Online Store.
- Tap Manage themes.
- Next to Debut, tap Customize.
- Tap Templates.
- Select Blog posts.
- Click the Posts section.
- Use the settings to customize your Posts section.
- Click Save.
Cart page
The Cart page section includes the following settings:
- Enable automatic cart updates - Select this option to update the cart as soon as customer changes are made. For example, the subtotal price can be updated when the customer changes the quantity of items in their cart.
- Enable cart notes - In some themes, this option is called Order notes.
Customize your Cart page section
- From your Shopify admin, go to Online Store > Themes.
- Next to Debut, click Customize.
- Open the drop-down menu at the top of the page.
- From the Shopify app, tap Store.
- In the Sales channels section, tap Online Store.
- Tap Manage themes.
- Next to Debut, tap Customize.
- Tap Templates.
- From the Shopify app, tap Store.
- In the Sales channels section, tap Online Store.
- Tap Manage themes.
- Next to Debut, tap Customize.
- Tap Templates.
- Select Cart.
- Click the Cart page section.
- Use the settings to customize your Cart page section.
- Click Save.
Featured collection
You can feature a collection on your home page. Featuring collections can help you promote sales and new collections.
The Featured collection section includes the following settings:
- Heading - Add the text that appears above the products in the collection. The default text is Featured collection.
- Collection - Choose the collection that you want to display in the section.
- Products per row - Choose the number of products to display in each row in the section.
- Rows - Choose the number of rows of products to display in the section.
- Show product vendor - Show the vendor for each product below the product title.
- Show 'View all' button - Select this option to add a View all button below the last row in the section. Customers can click this button to view the entire collection.
Add a featured collection to your home page
- From your Shopify admin, go to Online Store > Themes.
- Next to Debut, click Customize.
- From the Shopify app, tap Store.
- In the Sales channels section, tap Online Store.
- Tap Manage themes.
- Next to Debut, tap Customize.
- Tap Edit.
- From the Shopify app, tap Store.
- In the Sales channels section, tap Online Store.
- Tap Manage themes.
- Next to Debut, tap Customize.
- Tap Edit.
- Click Add section.
- Click Featured collections, and then click Select.
- Click Select collection, and then select a collection from the Collection list. Up to 50 products will be displayed from the collection that you select.
- Use the settings to customize your Featured collection section.
- Click Save.
Image with text
With Debut, you can add an image with text displayed to the right or left of the image. You can also add a button that links to another page.
You might use an image with text section to advertise a specific product or collection.
The Image with text section includes the following settings:
- Image - Add or select the image to include in the section. You can upload an image, use a previously-uploaded image, or select a free stock image from Burst.
- Image alignment - Choose whether the image in the section appears on the left or right.
- Heading - Add the primary text to pair with the image.
- Text - Add the secondary text to pair with the image. This text appears below the heading text.
- Button label - Add the text that you want to appear on the button.
- Button link - Set the URL or page that you want the button to link to. Paste in the URL or select a page from the menu. If you do not want to include a button in the section, then leave this field empty.
Add an image with text section to your home page
- From your Shopify admin, go to Online Store > Themes.
- Next to Debut, click Customize.
- From the Shopify app, tap Store.
- In the Sales channels section, tap Online Store.
- Tap Manage themes.
- Next to Debut, tap Customize.
- Tap Edit.
- From the Shopify app, tap Store.
- In the Sales channels section, tap Online Store.
- Tap Manage themes.
- Next to Debut, tap Customize.
- Tap Edit.
- Click Add section.
- Click Image with text, and then click Select.
- In the Image area, click Select image, and then do one of the following:
- To select an image that you have already uploaded to your Shopify admin, click the Library tab.
- To select a stock image from Burst, click the Free images tab. From here you can enter a search term, or browse the image categories.
- To select an image from your local computer, click the Library tab, and then click Upload.
- Use the settings to customize the section.
- Click Save.
Image with text overlay
You can feature a large image with a custom text overlay on your home page.
The Image with text overlay section includes the following settings:
- Image - Choose the image to include in the section. You can upload an image, use a previously-uploaded image, or select a free stock image from Burst.
- Image alignment - Choose whether the image in the section appears on the left or right.
- Layout - Set the width of the section.
- Section height - Set the height of the section. To prevent image cropping, select Adapt to image, which sets the height of the section based on the height of your image.
- Text size - Set the size of the text.
- Heading - Add primary text to pair with the image. The Image with text overlay section is automatically renamed to the heading that you provide.
- Text - Add the secondary text to pair with the image. This text appears below the heading text.
- Button label - Add the text that you want to appear on the button.
- Button link - Set the URL or page that you want the button to link to. Paste in the URL or select a page from the menu. If you do not want to include a button in the section, then leave this field empty.
Add an image with text overlay to your home page
- From your Shopify admin, go to Online Store > Themes.
- Next to Debut, click Customize.
- From the Shopify app, tap Store.
- In the Sales channels section, tap Online Store.
- Tap Manage themes.
- Next to Debut, tap Customize.
- Tap Edit.
- From the Shopify app, tap Store.
- In the Sales channels section, tap Online Store.
- Tap Manage themes.
- Next to Debut, tap Customize.
- Tap Edit.
- Click Add section.
- Click Image with text overlay, and then click Select.
- In the Image area, click Select image, and then do one of the following:
- To select an image that you have already uploaded to your Shopify admin, click the Library tab.
- To select a stock image from Burst, click the Free images tab. From here you can enter a search term, or browse the image categories.
- To select an image from your local computer, click the Library tab, and then click Upload.
- Use the settings to customize your image with text overlay section.
- Click Save.
Featured product
You can feature a product on your home page. Featuring a product is a great way to promote a new product or a product that's on sale. Customers can view additional product images using the left and right arrows below the image.
The featured product section includes the following settings:
- Product - Choose the product that you want to feature on the home page.
- Show quantity selector - Let users specify a quantity to add to their cart.
- Show variant labels - Show variant labels, such as "Size" and "Color" above variant drop-down menus. The variant labels that appear are based on the variant option names for the product.
- Show vendor - Show the product brand or vendor. For a brand or vendor to show, you need to add a vendor to the product.
- Show dynamic checkout button - Let customers skip the cart and go directly to the checkout from the featured product section.
- Show social sharing buttons - Show buttons that your customers can use to share your products on social media.
Media
- Size - Set the size of your product media.
- Enable image zoom - Let customers zoom in by mousing over the product image.
- Enable video looping - Loop product videos. If this option is deselected, a play button appears on videos when they end.
Add a featured product section
- From your Shopify admin, go to Online Store > Themes.
- Next to Debut, click Customize.
- From the Shopify app, tap Store.
- In the Sales channels section, tap Online Store.
- Tap Manage themes.
- Next to Debut, tap Customize.
- Tap Edit.
- From the Shopify app, tap Store.
- In the Sales channels section, tap Online Store.
- Tap Manage themes.
- Next to Debut, tap Customize.
- Tap Edit.
- Click Add section.
- Click Featured product, and then click Select.
- Use the settings to customize your featured product section.
- Click Save.
Newsletter
You can add a newsletter signup to your home page. This lets you collect customer email addresses for email marketing campaigns. You can learn more about email marketing on the Shopify blog.
Add a newsletter signup to your home page
- From your Shopify admin, go to Online Store > Themes.
- Next to Debut, click Customize.
- From the Shopify app, tap Store.
- In the Sales channels section, tap Online Store.
- Tap Manage themes.
- Next to Debut, tap Customize.
- Tap Edit.
- From the Shopify app, tap Store.
- In the Sales channels section, tap Online Store.
- Tap Manage themes.
- Next to Debut, tap Customize.
- Tap Edit.
-
Click Add section.
-
Click Newsletter, and then click Select.
-
Enter a heading for your newsletter signup.
-
Enter a subheading for your newsletter signup.
-
Click Save.
Map
You can add a Google map to your home page to show customers where your business is located.
The map section includes the following settings:
- Heading - Add a heading to your map section.
- Address and hours - Add your store's address and hours to your map section.
- Map address - Set the map to show your store's location.
- Map link label - Add a button that links to your location on Google Maps.
- Show pin - Add a pin that shows your store's specific location on the map.
- Google Maps API key - Add your map's API key to the map section.
- Image - Add an image that's displayed if the map doesn't load.
- Image position - Set the placement of the image.
Add a map to your home page
- From your Shopify admin, go to Online Store > Themes.
- Next to Debut, click Customize.
- From the Shopify app, tap Store.
- In the Sales channels section, tap Online Store.
- Tap Manage themes.
- Next to Debut, tap Customize.
- Tap Edit.
- From the Shopify app, tap Store.
- In the Sales channels section, tap Online Store.
- Tap Manage themes.
- Next to Debut, tap Customize.
- Tap Edit.
- Click Add section.
- Click Map, and then click Select.
- Use the settings to customize your map section.
- Click Save.
Rich text
Use the Rich text section to provide any written content that you want to display on your home page, or to embed any page created in your Shopify admin. For example, you can feature upcoming events by embedding your blog page, or display a page with any of the following:
- embedded videos from your online store
- a Google map with your store's location
- your store's contact information.
The rich text section includes the following settings:
-
Wide display - Decrease the margins on either side of your text.
-
Heading - Add a heading to your rich text section.
-
Text - Add and format your custom text. If you want to feature a page from your store, then click Add content and then click Page. Select a page to feature as your home page from the drop-down menu.
-
Size - Set the size of your text.
Add rich text to your home page
- From your Shopify admin, go to Online Store > Themes.
- Next to Debut, click Customize.
- From the Shopify app, tap Store.
- In the Sales channels section, tap Online Store.
- Tap Manage themes.
- Next to Debut, tap Customize.
- Tap Edit.
- From the Shopify app, tap Store.
- In the Sales channels section, tap Online Store.
- Tap Manage themes.
- Next to Debut, tap Customize.
- Tap Edit.
-
Click Add section.
-
Click Rich text, and then click Select.
-
Use the settings to customize your rich text section.
-
Click Save.
Video
You can add a YouTube video to your home page. Videos can engage customers and generate interest in your business.
The video section includes the following settings:
- Cover image - Add a cover image to your video. The cover image is hidden while the video plays.
- Image alignment - Align your cover image so that the most important part is always visible.
- Video link - Add the YouTube URL for your video.
- Show overlay - Add a layer of color over your video to help make text easier to read. If you set the video style to Image with play button, then the overlay is removed while the video plays.
- Style - Set the style of the video. The Background video style is only available on desktop. If customers visit your store by using a tablet or mobile device, then they always see the Image with play button style.
- Video height - Set the height of your video.
- Heading - Add a heading for your video.
- Text size - Add text to your video. If you set the video style to Image with play button, then the text is removed while the video plays.
Add a video to your home page
- From your Shopify admin, go to Online Store > Themes.
- Next to Debut, click Customize.
- From the Shopify app, tap Store.
- In the Sales channels section, tap Online Store.
- Tap Manage themes.
- Next to Debut, tap Customize.
- Tap Edit.
- From the Shopify app, tap Store.
- In the Sales channels section, tap Online Store.
- Tap Manage themes.
- Next to Debut, tap Customize.
- Tap Edit.
- Click Add section.
- Click Video, and then click Select.
- Use the settings to customize your video section.
- Click Save.
Slideshow
You can add a slideshow of images to your home page. In the slideshow section, you can set the height of the slides, add text and buttons, and choose whether your slideshow plays automatically.
The Slideshow section includes the following settings:
- Image slide - Choose an image to include in the slideshow. You can upload an image, use a previously-uploaded image, or select a free stock image from Burst. You can set the following settings for each slide:
- Image position - Choose the alignment of the image in the slideshow frame. You can learn more about image position in the guidelines below.
- Heading - Add the primary text to pair with the image.
- Subheading - Add the secondary text to pair with the image. This text appears below the heading text.
- Button label - Add the text that you want to appear on the button.
- Button link - Set the URL or page that you want the button to link to. Paste in the URL or select a page from the menu. If you do not want to include a button in the section, then leave this field empty.
- Slide height - Set the height of the slideshow. Learn more about how slide height affects your slideshow.
- Text size - Set the size of your headings on the slideshow.
- Text alignment - Choose the position of the text on your slides.
- Show overlay - Add a layer of color between an image and any text that is placed over the image. Overlays can help with color contrast and readability. You can set the color and opacity of the overlay in the color settings.
- Auto-rotate slides - Set the slideshow to play automatically.
- Change slides every - Choose how often to change slides.
To learn about slideshow image cropping and recommended image sizes, refer to the slideshow guidelines.
Add a slideshow to your home page
- From your Shopify admin, go to Online Store > Themes.
- Next to Debut, click Customize.
- From the Shopify app, tap Store.
- In the Sales channels section, tap Online Store.
- Tap Manage themes.
- Next to Debut, tap Customize.
- Tap Edit.
- From the Shopify app, tap Store.
- In the Sales channels section, tap Online Store.
- Tap Manage themes.
- Next to Debut, tap Customize.
- Tap Edit.
- Click Add section.
- Click Slideshow, and then click Select.
-
To add an image slide, do the following steps:
- In the Content area, click Add image slide.
- Under Image, click Select image. To upload an image from your computer, click Upload. To use a free stock image from Burst, click Free images.
- To choose how you want to align the image in the slideshow, select a position from the Image position drop-down menu. You can learn more about image position in the guidelines below.
- To add text to the image slide, enter text in the Heading field, the Subheading field, or both.
- Add a button to your image slide by entering text in the Button label field. Select a part of your online store for the button to link to in the Button link field.
-
Use the settings to customize your slideshow section.
-
Click Save.
Slideshow guidelines
You can use the settings and image recommendations below to control the way that your slideshow looks on your online store. The way that your slides appear is determined by the following factors:
- The dimensions of your images
- Your image position settings
- Your slide height settings
- The width-to-height ratio of your images
Because of differences in screen size and shape, your slides might look different on mobile and desktop devices.
Image size recommendations
The recommended dimensions for slideshow images depend on your slide height settings. Use the following guidelines:
| Slide height setting | Recommended width | Recommended height |
|---|---|---|
| Adapt to first image | 1200 px | 600 px |
| Small | 1200 px | 475 px |
| Medium | 1200 px | 489 px |
| Large | 1200 px | 775 px |
To view or change your slide height settings, see step 5 of the instructions to create a slideshow.
Image cropping
You can take steps to control how your images are cropped or to avoid image cropping altogether.
Control how your images are cropped
You can expect image cropping on some screen sizes in the following situations:
- Your images don't have the same width-to-height ratio.
- Your slide height is set to Small, Medium, or Large.
- Your slide height is set to Adapt to first image and your images are taller than the device screen or browser window.
You can control how your images are cropped by using the Image position setting.
For each image, you can choose which part you want to keep in view when cropping occurs. In the following example, you can see how the same image might be cropped for some screen sizes. The slide on the left has the image position set to Middle center. The slide on the right has the image position set to Top left.
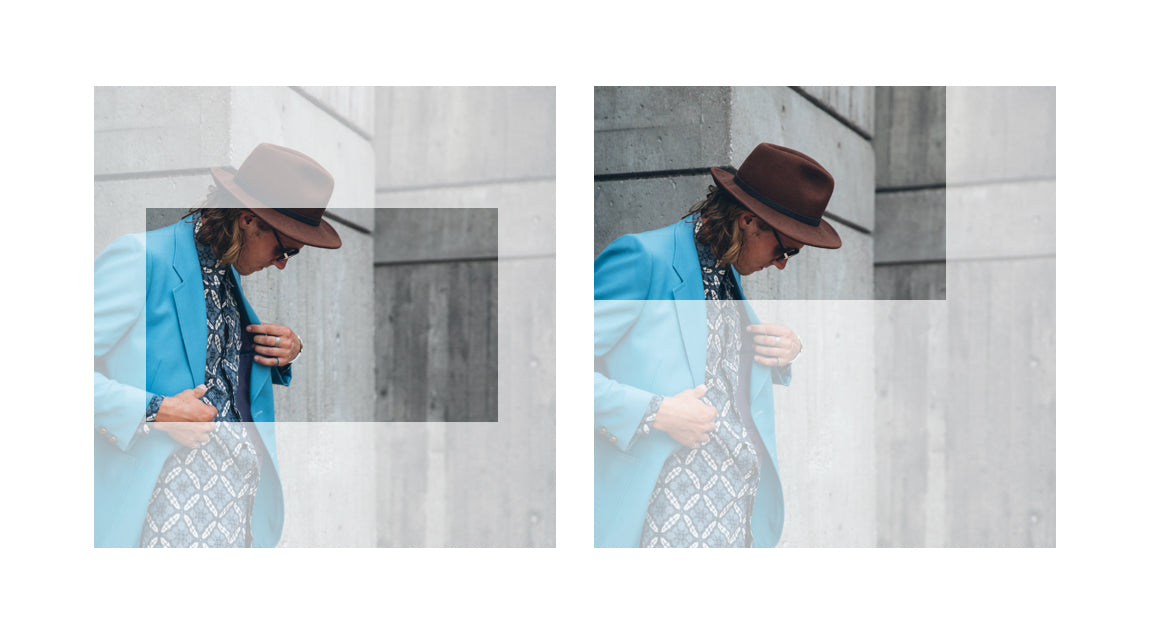
To view or change your image position settings, refer to step 10 of the instructions to create a slideshow.
Avoid image cropping
To avoid image cropping in your slideshow, try the following steps:
- Set your slide height to Adapt to first image.
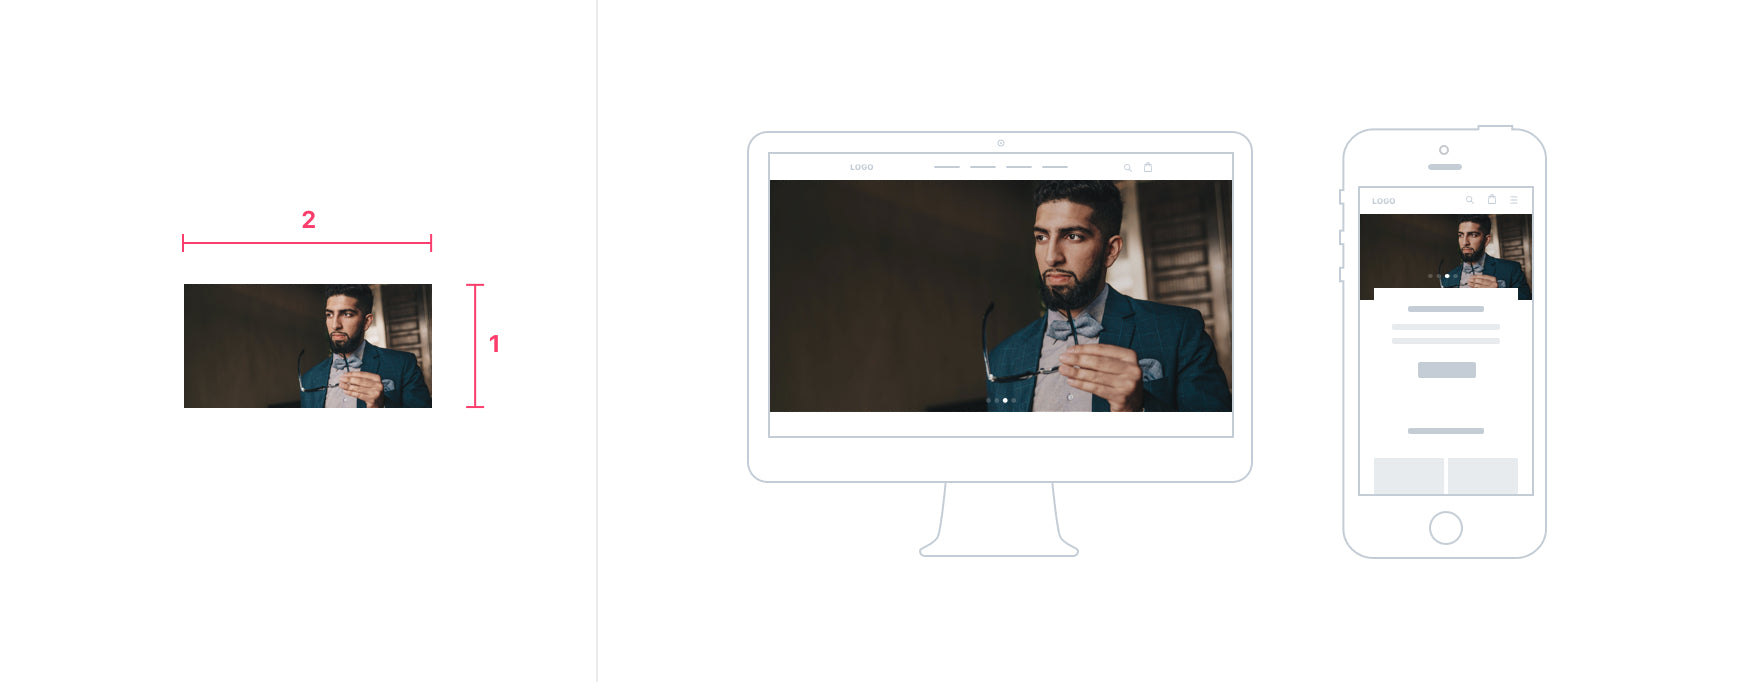
- Use images that are twice as wide as they are tall. Such images have a width-to-height ratio of 2:1. The recommended dimensions are 1200 px by 600 px.
- Make sure that all of your slides have the same width-to-height ratio. The ratio of your slides is more important than their dimensions in pixels.
In the following example, a slideshow image with a 2:1 ratio is shown on a desktop and a mobile device:
Slide height
The width of the slideshow section is always 100% of the browser window. The height of your slides is relative to the width. Because of differences in screen size, the width and height of your slides varies for different devices. The height of your slides is also influenced by your slide height settings.
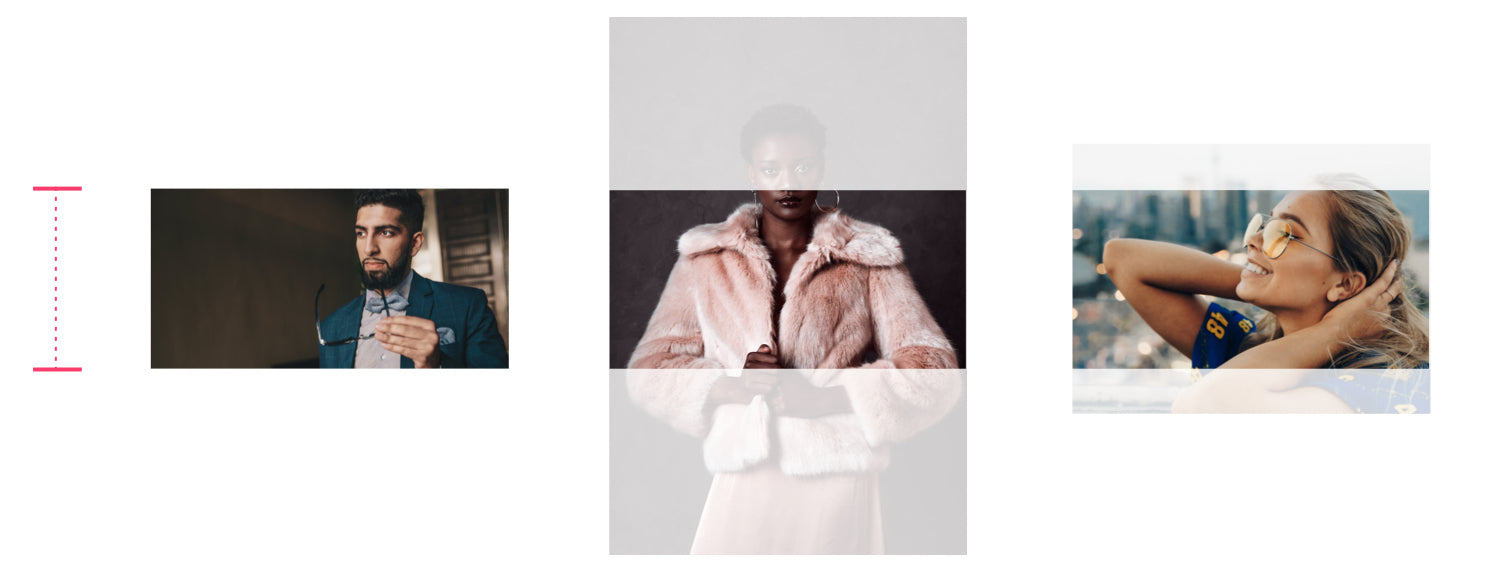
You can use the Adapt to first image slide height setting to base the height of your slideshow on the height of your first image. This setting works best when all your images are the same size, or have the same width-to-height ratio. If your images are different sizes or have different ratios, then you can change the order of your slides to see how they look at different heights.
In the following example, the shortest slide is positioned first:
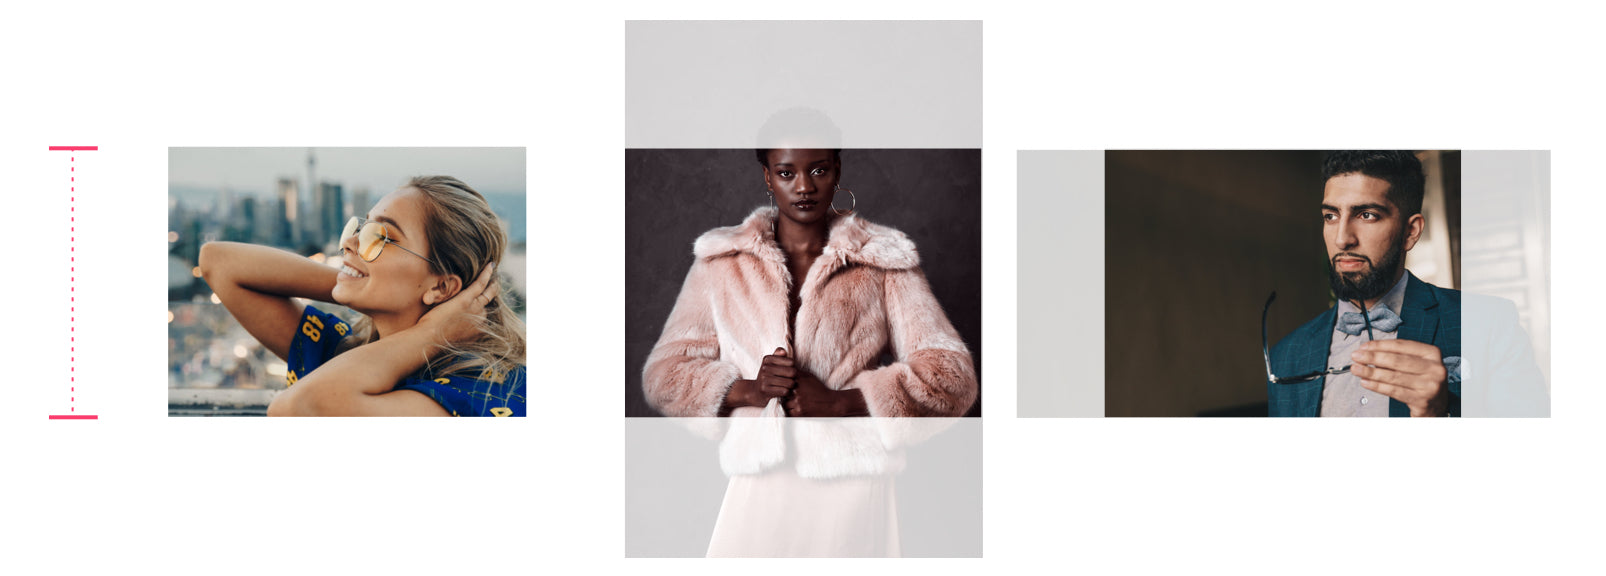
In the next example, a taller slide is positioned first:
If you use the Small, Medium, or Large height settings instead, then refer to the image size recommendations for your slides.
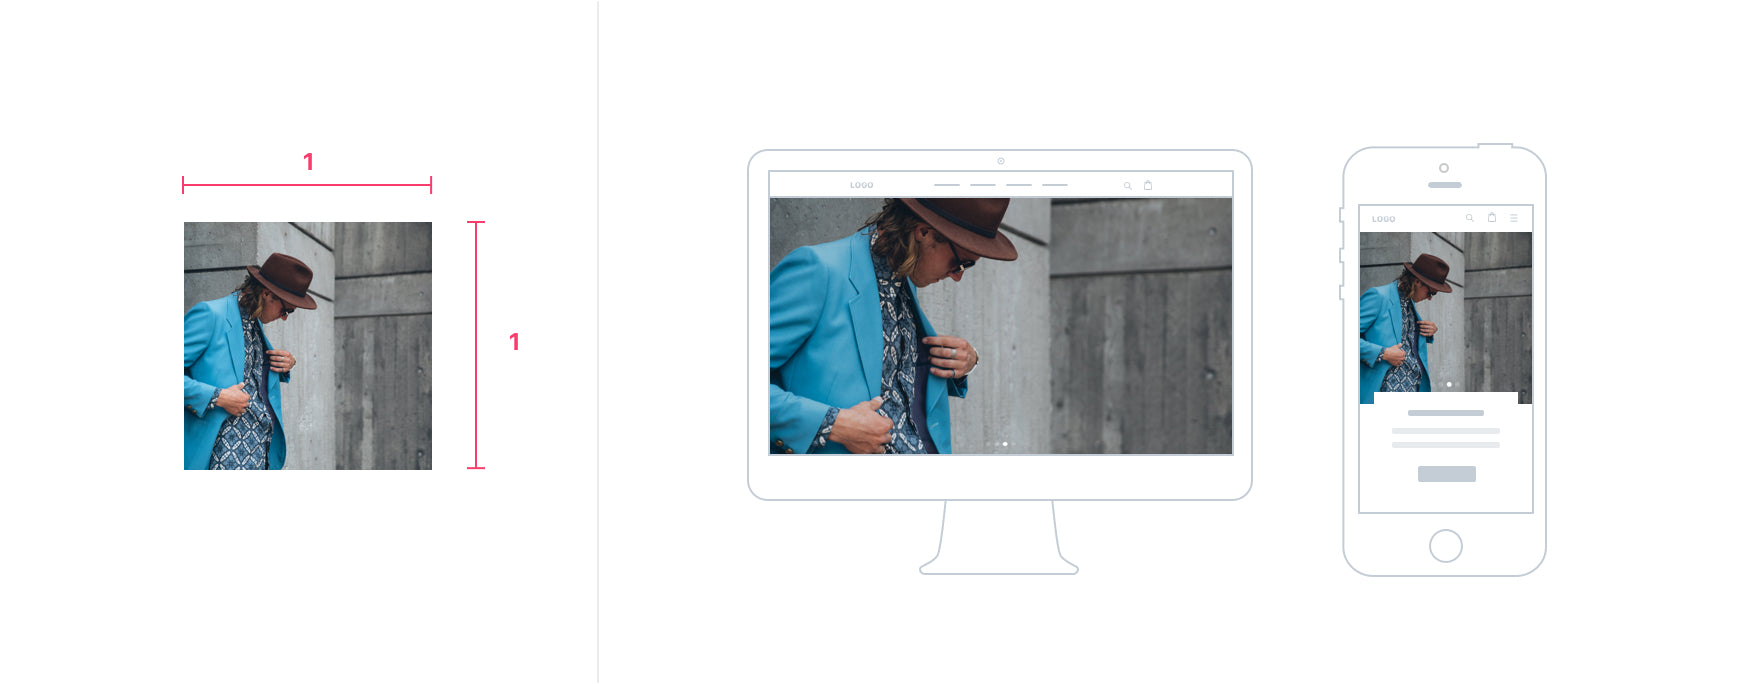
Image ratios
If you want to avoid image cropping in your slideshow, then the recommended width-to-height ratio for your images is 2:1.
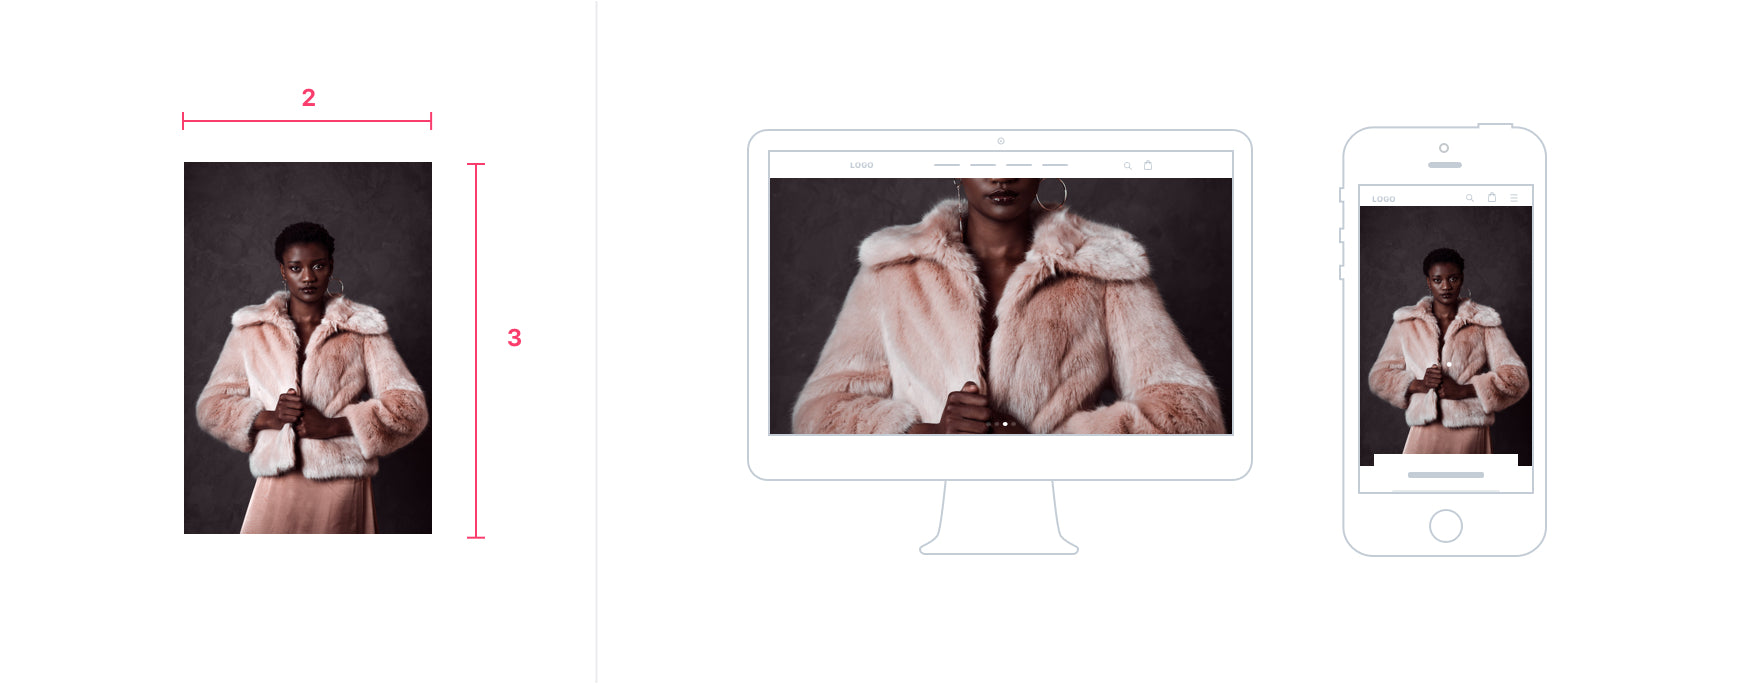
If you aren't concerned about cropping on desktop displays and want to make an impact on mobile devices, then use images that are square, or images that are taller than they are wide. The following example slide shows a square image, which has a 1:1 width-to-height ratio.
The next example slide shows a portrait image with a 2:3 width-to-height ratio.
How To Change The Footer Background Color In Shopify For Debut Theme
Source: https://help.shopify.com/en/manual/online-store/themes/os/themes-by-shopify/debut/sections
Posted by: murraybrounrave.blogspot.com
0 Response to "How To Change The Footer Background Color In Shopify For Debut Theme"
Post a Comment